The weekend before Halloween, I hosted a pumpkin carving party at my apartment. With Hurricane Sandy blowing her way toward the Northeast, we opted to move the party indoors instead of enjoy the crisp fall air and colorful leaves outdoors. I have to admit I'm a little disappointed that Mother Nature created the most beautiful party decorations and we were unable to take advantage. Maybe next year. Inside though, with all of our guests, we were comfy and warm and filling our bellies with some of the best autumn foods before setting to work carving our pumpkins.
The menu included: turkey chili, corn bread (made by a guest), garlic hummus with veggies, chips and salsa, pumpkin chocolate chip cookies, spring rolls (made by a guest), caramel covered apple bites, home-brewed pumpkin beer and my favorite: miniature pumpkin pies with freshly whipped heavy cream.
When it comes to pumpkin pie or pumpkin roll, I always turn to Libby's for a guaranteed good recipe. The pumpkin pie recipe is posted online as follows:
3/4 cup granulated sugar
1 tsp ground cinnamon
1/2 tsp salt
1/2 tsp ground ginger
1/4 tsp ground cloves
2 large eggs
1 can (15 oz) pumpkin puree
1 can (12 oz) evaporated milk
The directions are incredibly simple, and Libby's rates the recipe level as "easy:"
In a small bow, mix sugar, cinnamon, salt, ginger and cloves. In a separate, large bowl, beat the eggs. Stir the pumpkin and the sugar-spice mixture into the large bowl. Slowly stir in the evaporated milk.
Easy? They weren't kidding.
All that's left to do is pour the pie filling mixture into the pie shell and bake. The recipe recommends a 9-inch unbaked pie shell with a 4-cup volume, but I was making an easy-to-eat dessert for a party with 9 adult guests and a 4-year-old. To accomplish that, I found Keebler's miniature graham cracker pie crusts. Not traditional for pumpkin pie, but everyone loved the graham cracker crust. I made a dozen miniature pies, and had extra pie filling left.
Baking instructions are to preheat the oven to 425 for 15 minutes, then reduce the heat to 350. Bake the pie for 40-50 minutes and cool on a wire rack for 2 hours.
Given that my party preparation time for making the food was a little tight, I skipped the preheat time and baked the pies at 400 until they were done. They came out juuuust fine. Also, instead of the individual measurements of separate spices, I added 2 tsp of pumpkin pie spice.
To make freshly whipped cream, I put a metal bowl and the beaters for an electric hand mixer in the freezer for about 15 minutes. I'm sure there's a kitchen-science reason for this, but I do it for the reason a lot of us probably do many things in the kitchen: "because that's how mom always did it." When the bowl and beaters are cold, pour heavy cream into the bowl and beat on high until it turns from liquid into a firm but fluffy consistency - whipped cream!
I really loved having the mini pies as opposed to one large pie. They were the perfect serving size for one person, were in their own foil pie tins so no need for an extra plate, and they make sending leftovers home with guests easy as...pie!
Monday, November 5, 2012
Wednesday, October 3, 2012
The $7 Savior
Ever have those nights when you're just not interested in cooking dinner? Oh I know - me either. That's crazy talk.
Real talk now. We all have those nights. There are plenty of convenient foods available, but I've got to be honest. I feel ashamed of myself if I'm caught with a Wendy's bag. And pizza, well, that's not super friendly for the health conscious among us.
If you'd like your meal to maintain some semblance of being home-cooked, that's where the "$7 Savior" comes in. My neighborhood grocery store sells freshly made rotisserie chickens for just under $7 and they sure do the trick.
Of course you can eat the chicken with some homemade sides, like asparagus sauteed in olive oil and lemon juice, garlic bread, a small salad, etc., I like to get a bit creative with my rotisserie chicken meals.
Here are my top three:
1. Chicken Soup
This one is slightly more time intensive, but is absolutely worth it. Here is a detailed recipe for perhaps the easiest chicken soup you'll ever make (no, opening a can does not count). Basically, saute your garlic and onions, add water and Better than Bouillon, chop and add the rest of your veggies and your pulled apart rotisserie chicken (no bones). Heat until the veggies soften and there's dinner.
2. Chicken Nachos
This is a great appetizer to get when you go out to dinner with friends, but why wait for that occasion? Spread your tortilla chips on a baking sheet, pull apart some of the breast meat from the rotisserie chicken and stop the chips with shredded cheese. I like to keep my nachos simple - just chicken, cheese and salsa - but the toppings options are numerous. I add the salsa to my nachos after they come out of the oven.
3. Salad
Salads are great, but not always filling. When I buy a rotisserie chicken, I almost always get about 4 meals out of one chicken, and a couple of them are usually salads. It's a great, easy, quick option for me to prepare for lunch at work. Just pull apart some of the rotisserie chicken and add it to your greens and whatever other veggies make your salad complete, then pack your salad dressing, croutons, etc. separately.
So the next time you're looking for a time saver in the kitchen, don't think twice about calling on the $7 Savior. You'll could be eating easy, inexpensive and healthy meals in no time!
Real talk now. We all have those nights. There are plenty of convenient foods available, but I've got to be honest. I feel ashamed of myself if I'm caught with a Wendy's bag. And pizza, well, that's not super friendly for the health conscious among us.
If you'd like your meal to maintain some semblance of being home-cooked, that's where the "$7 Savior" comes in. My neighborhood grocery store sells freshly made rotisserie chickens for just under $7 and they sure do the trick.
Of course you can eat the chicken with some homemade sides, like asparagus sauteed in olive oil and lemon juice, garlic bread, a small salad, etc., I like to get a bit creative with my rotisserie chicken meals.
Here are my top three:
1. Chicken Soup
This one is slightly more time intensive, but is absolutely worth it. Here is a detailed recipe for perhaps the easiest chicken soup you'll ever make (no, opening a can does not count). Basically, saute your garlic and onions, add water and Better than Bouillon, chop and add the rest of your veggies and your pulled apart rotisserie chicken (no bones). Heat until the veggies soften and there's dinner.
2. Chicken Nachos
This is a great appetizer to get when you go out to dinner with friends, but why wait for that occasion? Spread your tortilla chips on a baking sheet, pull apart some of the breast meat from the rotisserie chicken and stop the chips with shredded cheese. I like to keep my nachos simple - just chicken, cheese and salsa - but the toppings options are numerous. I add the salsa to my nachos after they come out of the oven.
3. Salad
Salads are great, but not always filling. When I buy a rotisserie chicken, I almost always get about 4 meals out of one chicken, and a couple of them are usually salads. It's a great, easy, quick option for me to prepare for lunch at work. Just pull apart some of the rotisserie chicken and add it to your greens and whatever other veggies make your salad complete, then pack your salad dressing, croutons, etc. separately.
So the next time you're looking for a time saver in the kitchen, don't think twice about calling on the $7 Savior. You'll could be eating easy, inexpensive and healthy meals in no time!
Tuesday, July 17, 2012
Just throw it together
I'm due for a grocery shopping trip...one of the big guys. I recently implemented a budget for myself and I allotted $50/week for groceries. Since I've gotten sloppy with the grocery shopping as of late, I end up making several last minute trips to the grocery store during the week. While I'm not quite sure how it all adds up, I know it adds up. So the plan is to try to make one shopping trip for the main items, and if need be, stop back one more time for fresh items like produce or dairy. By shopping once a week (rather than bi-weekly or monthly), I should be able to make it without that second trip. I restart my budget every Friday, so that I can begin the week with my grocery shopping trip on the weekend. Other than an unexpected (and somewhat expensive) trip to the vet, things seem to be going okay for the most part. I did get off track last week, but tomorrow is Friday (and payday! and 1 month from starting the budget project) so I'll begin my budget anew.
Now onto the food...
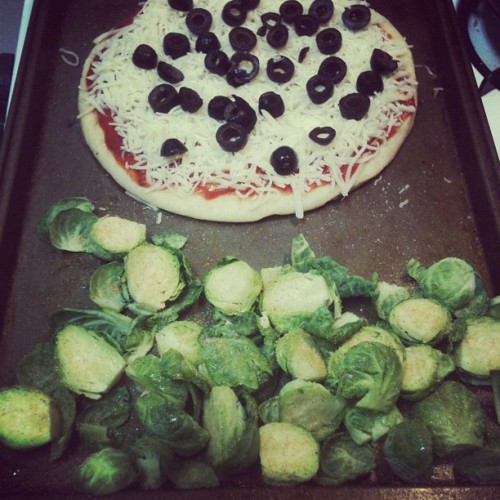
Over the weekend I picked up ingredients for pita pizzas, which Ash and I made for dinner on Sunday. The pizzas are great - around 400 calories for a traditional white pocketless pita with a little olive oil, seasoned pizza sauce, mozzarella cheese, Italian blend cheese and black olives. I also had a container of brussel sprouts I bought toward the end of last week. Usually I buy brussel sprouts from my co-op - they have a large bin and you scoop out individual brussel sprouts, taking just the right amount for you. The store is undergoing renovations right now, and the pop-up produce market outside was all out of my veggie. I ended up having to purchase a carton of them at the grocery store, and it contained a far larger quantity than I needed, so I've been eating them most nights for dinner in an effort to use 'em up and not waste. So last night's dinner was a combination of extra ingredients I had in the fridge, and it ended up making the perfect dinner - just under 500 calories and using up my leftovers so they don't get wasted.
For the pizza, I spritzed the pita with olive oil, sprinkled on garlic powder, added about two tablespoons of sauce, the cheese and the olive slices. I washed and cut the brussel sprouts (cut the end nub off and then cut them in half), sprayed with my olive oil mister, sprinkled on some garlic powder and baked in the oven with my pizza at 425 for about 30 minutes. Done and done. And yum!
Now onto the food...
Over the weekend I picked up ingredients for pita pizzas, which Ash and I made for dinner on Sunday. The pizzas are great - around 400 calories for a traditional white pocketless pita with a little olive oil, seasoned pizza sauce, mozzarella cheese, Italian blend cheese and black olives. I also had a container of brussel sprouts I bought toward the end of last week. Usually I buy brussel sprouts from my co-op - they have a large bin and you scoop out individual brussel sprouts, taking just the right amount for you. The store is undergoing renovations right now, and the pop-up produce market outside was all out of my veggie. I ended up having to purchase a carton of them at the grocery store, and it contained a far larger quantity than I needed, so I've been eating them most nights for dinner in an effort to use 'em up and not waste. So last night's dinner was a combination of extra ingredients I had in the fridge, and it ended up making the perfect dinner - just under 500 calories and using up my leftovers so they don't get wasted.
For the pizza, I spritzed the pita with olive oil, sprinkled on garlic powder, added about two tablespoons of sauce, the cheese and the olive slices. I washed and cut the brussel sprouts (cut the end nub off and then cut them in half), sprayed with my olive oil mister, sprinkled on some garlic powder and baked in the oven with my pizza at 425 for about 30 minutes. Done and done. And yum!
Thursday, June 7, 2012
Growing Dinner
We've had all sorts of wonderful rain storms lately - so that stay the entire day, others that roll in and out without warning, some with rumbles of thunder and flashes of lightning. It's doing wonders for my garden.
Last night I cut these beautiful bunches of greens, freshly washed off my a passing storm.
And then I made this delightful chicken Caesar salad. The chicken is from a local farm - free range and no antibiotics. Just cooked with a little olive oil and garlic. Add some halved grape tomatoes, croutons, a little shredded mozzarella (I forgot the shaved parmesan...I'm good at forgetting), and light Caesar dressing. And that's dinner...filling yet light and fresh.
Last night I cut these beautiful bunches of greens, freshly washed off my a passing storm.
And then I made this delightful chicken Caesar salad. The chicken is from a local farm - free range and no antibiotics. Just cooked with a little olive oil and garlic. Add some halved grape tomatoes, croutons, a little shredded mozzarella (I forgot the shaved parmesan...I'm good at forgetting), and light Caesar dressing. And that's dinner...filling yet light and fresh.
Tuesday, June 5, 2012
Here, Piggy Piggy
For someone who grew up a Carolina girl, I discovered the delicious pulled pork sandwich late in life. I always knew it was there, hanging out at every BBQ joint in town, but never did my taste buds say "Yo, sister - we need that!" Then one fateful October night when I was in college, I found myself walking by the pulled pork stand at the North Carolina State Fair. I paused, pondered, and took the first step toward happiness: I got in line. I loved that sandwich so much, the next night I got another.
I've made pulled pork in a crock pot 3 or 4 times over the past year or so, and each time the flavor has been a little bit different, but always good.
I used a cut of pork called a "Boston butt," which had the bone in and a layer of fat on the bottom of the cut of meat. When making pulled pork in a crock pot, you do want some amount of fat on the meat to add a little flavor while the meat is slow cooking.
The next step was a little crazy - I opened the spice cabinet and started digging through, pulling out this and that and dumping whatever amount spoke to me into a mixing bowl. The mix contained cayenne pepper, chili powder, paprika, onion powder, garlic powder, sea salt, cumin, coriander...and I think that may be it. Like I said, it was a bit of a tornado-in-the-kitchen moment. Once mixed together, I rubbed the mixture all over the cut of meat and let it sit for a few minutes. This time, I did not brown the meat before cooking, and I think it was for the better.
I forgot to pick up a yellow onion at the grocery store, but luckily I keep a bag of Trader Joe's pearl onions in the freezer (they sell the most useful products!). In a little olive oil and a couple tablespoons of evaporated cane sugar, I sauteed the onions until they became caramelized, then put them in the crock pot. Ash and I looked through the various stouts he picked up at a little by-the-bottle beer convenience store (in PA, you otherwise have to buy beer by the case from a distributor). We chose three, poured them in the crock pot over the chunk of pig, and added a Blue Moon because we needed a little more liquid. I also added about half a jar of McCutcheon's BBQ sauce and a healthy dose of Cotton Honey straight from North Carolina. It's a great sauce with real, fresh ingredients. Finally, I threw in a couple of bay leaves. Usually I add fresh thyme, but /i forgot that, too...oops!
The pig was cooking by noon and we ate around 9 that night. Half to three-quarters of the time, the crock pot was set to "high" and the rest of the time it was set to "low." The meat pulled apart amazingly and we shredded it into fine pieces. I added a little of the "juice" and a dash of salt and then piled it on toasted potato rolls. Ash made all sorts of sauce concoctions to mix with his shredded pork. I definitely tasted a bit of heat from the cayenne pepper but it was just the right amount.
The next day I reheated some of the meat to have a sandwich for lunch and I swear it was even better than the day it was first cooked. I tasted a little more spiciness and a bit more flavor overall (I added a little of the juice to the meat before storing it in the fridge).
Honestly, the worst part of this process is the clean-up. Prep is easy, and cooking is almost effortless, since the crock pot does it all for you. This is a great meal to prepare for your own family, or something great to prepare the day before and bring to a potluck or cook-out. Nobody will be disappointed!
I've made pulled pork in a crock pot 3 or 4 times over the past year or so, and each time the flavor has been a little bit different, but always good.
I used a cut of pork called a "Boston butt," which had the bone in and a layer of fat on the bottom of the cut of meat. When making pulled pork in a crock pot, you do want some amount of fat on the meat to add a little flavor while the meat is slow cooking.
The next step was a little crazy - I opened the spice cabinet and started digging through, pulling out this and that and dumping whatever amount spoke to me into a mixing bowl. The mix contained cayenne pepper, chili powder, paprika, onion powder, garlic powder, sea salt, cumin, coriander...and I think that may be it. Like I said, it was a bit of a tornado-in-the-kitchen moment. Once mixed together, I rubbed the mixture all over the cut of meat and let it sit for a few minutes. This time, I did not brown the meat before cooking, and I think it was for the better.
I forgot to pick up a yellow onion at the grocery store, but luckily I keep a bag of Trader Joe's pearl onions in the freezer (they sell the most useful products!). In a little olive oil and a couple tablespoons of evaporated cane sugar, I sauteed the onions until they became caramelized, then put them in the crock pot. Ash and I looked through the various stouts he picked up at a little by-the-bottle beer convenience store (in PA, you otherwise have to buy beer by the case from a distributor). We chose three, poured them in the crock pot over the chunk of pig, and added a Blue Moon because we needed a little more liquid. I also added about half a jar of McCutcheon's BBQ sauce and a healthy dose of Cotton Honey straight from North Carolina. It's a great sauce with real, fresh ingredients. Finally, I threw in a couple of bay leaves. Usually I add fresh thyme, but /i forgot that, too...oops!
The pig was cooking by noon and we ate around 9 that night. Half to three-quarters of the time, the crock pot was set to "high" and the rest of the time it was set to "low." The meat pulled apart amazingly and we shredded it into fine pieces. I added a little of the "juice" and a dash of salt and then piled it on toasted potato rolls. Ash made all sorts of sauce concoctions to mix with his shredded pork. I definitely tasted a bit of heat from the cayenne pepper but it was just the right amount.
The next day I reheated some of the meat to have a sandwich for lunch and I swear it was even better than the day it was first cooked. I tasted a little more spiciness and a bit more flavor overall (I added a little of the juice to the meat before storing it in the fridge).
Honestly, the worst part of this process is the clean-up. Prep is easy, and cooking is almost effortless, since the crock pot does it all for you. This is a great meal to prepare for your own family, or something great to prepare the day before and bring to a potluck or cook-out. Nobody will be disappointed!
Sunday, May 27, 2012
Review: Eco-friendly Palm Leaf Plates
I was recently provided the opportunity by Marx Foods to review their Palm Leaf Plates, listed online as "eco-friendly" and "disposable." While Marx Foods has provided these plates free for my review, the following written opinions are solely my own based on my experience while using Palm Leaf Plates.
To get a little background information for what I am reviewing, I went to the Marx Foods website to look at the variety of plates offered, read about how they are made, and most importantly (for many people) - checked pricing.
Now, pardon me while I get a little nerdy. Given my background in environmental science and my respect for the land and sea, something new I learned and absolutely love is that these plates are made from palm leaves that have already fallen from the tree. The Adaka (or Adakka or areca nut) palm trees are not cut down, palm fronds are not cut from the trees - there is no deforestation or stripping of the trees. Tree huggers, rejoice! The collected leaves are rinsed in water, hand-washed in water and turmeric (that's right - the spice), rinsed once more in water, then allowed to air dry. In order to maximize resources, various shapes of plates and bowls are cut from each stretched and flattened palm leaf, and then heat pressed into shape. Pretty cool, right? I'd be interested in learning a little more about where the leaves are collected (the mighty Internet tells me these trees are found in the tropical Pacific, Asia and India), if fair trade/fair wages are involved in employing local residents, etc.
Just how durable are these plates? I used my plates to serve hearty helpings of teriyaki chicken and broccoli over udon noodles. The teriyaki sauce is thick and in excess, so some sauce puddles on the bottom of the plates. The plates are thicker than your standard paper plate and have a feeling similar to that of corn husks.
So how about cost? These plates will empty your wallet a little faster than purchasing their paper or plastic counterparts. A standard dinner size plate (9.5 inches x 9.5 inches) in a pack of 25 plates is sold for $34 and a pack of 100 plates is sold for $77. Packages of salad plates (6.75 inches x 6.75 inches) sell for $31 (25 plates) and $69 (100 plates). As with most products that are harvest and produced in a sustainable and fair manner, your price supports far more than the tangible product you hold in your hand. Similarly, the cheap price you pay for traditional foods and products excludes the environmental cost the production of that food or product has on our environment and resources. While I can say for certain that I would not be willing to purchase these plates every time I have a backyard BBQ, I would certainly consider them for other special occasions. They would be great for a rustic or country themed wedding, particularly when compared to the cost of rentals, a fun little wine and cheese party with your girlfriends, to carry a shared dish to a potluck, etc. Sadly, these plates aren't made to be re-used, so that makes the cost hurt a bit more.
Overall, the palm leaf plates are durable in the sense that they don't leak, but depending on the heat of the food, the plates may warp a little. The cost is higher than the typical disposable product, but is created in a far more sustainable manner. Since palm leaf plates are compostable, I rinsed the excess sauce from the plates, and into the compost they'll go in the morning. I'm eager to see how long they last before beginning to break down!
To get a little background information for what I am reviewing, I went to the Marx Foods website to look at the variety of plates offered, read about how they are made, and most importantly (for many people) - checked pricing.
Now, pardon me while I get a little nerdy. Given my background in environmental science and my respect for the land and sea, something new I learned and absolutely love is that these plates are made from palm leaves that have already fallen from the tree. The Adaka (or Adakka or areca nut) palm trees are not cut down, palm fronds are not cut from the trees - there is no deforestation or stripping of the trees. Tree huggers, rejoice! The collected leaves are rinsed in water, hand-washed in water and turmeric (that's right - the spice), rinsed once more in water, then allowed to air dry. In order to maximize resources, various shapes of plates and bowls are cut from each stretched and flattened palm leaf, and then heat pressed into shape. Pretty cool, right? I'd be interested in learning a little more about where the leaves are collected (the mighty Internet tells me these trees are found in the tropical Pacific, Asia and India), if fair trade/fair wages are involved in employing local residents, etc.
Just how durable are these plates? I used my plates to serve hearty helpings of teriyaki chicken and broccoli over udon noodles. The teriyaki sauce is thick and in excess, so some sauce puddles on the bottom of the plates. The plates are thicker than your standard paper plate and have a feeling similar to that of corn husks.
The first thing that I noticed was, while the plate held the weight of the meal, it began to buckle when I picked it up with one hand. My guess is that because the food was hot, the heat caused that to happen.
By the end of the meal, the plate was still in tact, and none of the sauce seeped through.
As my boyfriend - who works in industrial design - noted when he began to peel apart one of the plates, the creases in the plate are all oriented in the same direction. The interpretation here is that if the palm leaves were stacked in multiple directions prior to heat pressing (think of the way plywood/pressboard is made), they may be less likely to buckle. Since we are certainly not experts in the design or production of these plates, this is purely an educated guess.
To fill another curiosity, I decided to put a small palm leaf plate under one of my house plants to serve as a tray for excess water. These plates aren't necessarily designed to hold water, but I decided to test it anyway! The plate did warp (as expected from the information provided on the Marx Foods website), but did not leak.
So how about cost? These plates will empty your wallet a little faster than purchasing their paper or plastic counterparts. A standard dinner size plate (9.5 inches x 9.5 inches) in a pack of 25 plates is sold for $34 and a pack of 100 plates is sold for $77. Packages of salad plates (6.75 inches x 6.75 inches) sell for $31 (25 plates) and $69 (100 plates). As with most products that are harvest and produced in a sustainable and fair manner, your price supports far more than the tangible product you hold in your hand. Similarly, the cheap price you pay for traditional foods and products excludes the environmental cost the production of that food or product has on our environment and resources. While I can say for certain that I would not be willing to purchase these plates every time I have a backyard BBQ, I would certainly consider them for other special occasions. They would be great for a rustic or country themed wedding, particularly when compared to the cost of rentals, a fun little wine and cheese party with your girlfriends, to carry a shared dish to a potluck, etc. Sadly, these plates aren't made to be re-used, so that makes the cost hurt a bit more.
Overall, the palm leaf plates are durable in the sense that they don't leak, but depending on the heat of the food, the plates may warp a little. The cost is higher than the typical disposable product, but is created in a far more sustainable manner. Since palm leaf plates are compostable, I rinsed the excess sauce from the plates, and into the compost they'll go in the morning. I'm eager to see how long they last before beginning to break down!
Tuesday, May 22, 2012
Chicken teriyaki udon noodles
Do you have a favorite recipe that you feel like you could eat almost every day? I have definitely found mine. Browsing recipes online, I came across Caramelized Baked Chicken Wings on Cathy's Kitchen Journey. The flavor of this wing sauce is superb. I do generally love stir fry and teriyaki sauce, but this steps it up a notch, and I love that it's comprised of fairly standard pantry ingredients.
I've made some adaptations to the original recipe, which are as follows (makes enough sauce for 2-3 servings):
- 1/3 cup of low sodium soy sauce
- 1 tablespoon of honey
- 1 tablespoon of ketchup
- 1 teaspoon of extra virgin olive oil
- 1 teaspoon of minced garlic (I use pre-minced, from a jar)
- 1/2 teaspoon of ginger paste
- 1/2 teaspoon of cornstarch (to thicken)
Combine all of the above ingredients in a saucepan (my measurements are more of the "eyeball" type rather than exact) and heat, stirring with a fork or whisk, until the sauce becomes bubbly and begins caramelizing. Heat and stir for about 1-2 minutes more. The prep and cooking time for the sauce is fairly quick, so be sure to time it appropriately with the prep and cooking for the rest of the meal.
Chicken: I cut up about 4 oz. of boneless, skinless chicken breast and cooked over medium heat in a frying pan sprayed with extra virgin olive oil.
Broccoli: I rinsed, cut, steamed and drained the broccoli from one medium-sized broccoli crown.
Udon Noodles: I was originally planning this meal with rice noodles, but my classy neighborhood grocery store doesn't carry rice noodles...I should have known. The last time I bought them, I did so at my co-op, so udon noodles it was. Boil them for about 5 minutes until they are tender, then drain.
Once the chicken was finished cooking, I stirred it in a little bit of the sauce to cover all of the pieces of chicken. First I plated the udon noodles, then the chicken and the broccoli, and finally I poured the remaining sauce over the entire scrumptious pile of food. So delicious.
The full prepared recipe I made was 500 calories. I didn't have a full appetite for dinner, so I ate about half and saved the rest for lunch the next day. It reheated surprisingly well, too.
Labels:
broccoli,
chicken,
teriyaki,
udon noodles,
veggies
Subscribe to:
Posts (Atom)