 |
| A butter croissant, muenster cheese and avocado. |
Wednesday, December 26, 2012
Saturday, December 15, 2012
Oh, Martha!
Martha Stewart never ceases to amaze me with all of her crafty ideas. From cooking to cleaning to actual crafting, the woman does and knows it all.
Over the years, I have made an effort to have a gentler impact on the planet in all aspects of my life, stemming from my collegiate background in marine and environmental science. Food is an easy one, as is most seen in this blog, but I also try to use less harsh products when it comes to cleaning my home. It's better for the planet, it's better for my pets and it's better for me. Strong chemical products quickly leave me with a headache, so my go-to cleaners are usually a spray bottle of white vinegar diluted with water or a spray bottle with two to three ounces of Dr. Bronner's liquid pure castile soap (peppermint scent) diluted with water.
Earlier this week, I came across the recipe for Martha Stewart Tub Scrub on Pinterest. With all the ingredients already at home, I mixed up a small batch and gave it a shot. I wet the tile walls of my shower, and armed with a tough bristled scrub brush, glopped on some of the Tub Scrub and let the abrasive power of baking soda and a little elbow grease do the rest.
A little while later, I had shiny white tiles in my shower. In Philly, hard water build-up is no stranger. I spray tough spots with diluted bleach and scrub, but that doesn't always do the trick. In the past, I've tried CLR (lime is a key component of hard water stains), but the smell was so strong I gagged. No thanks. As I scrubbed with my Tub Scrub mixture, I was surprised (okay, and pretty grossed out) to see beige water running down the walls. Looking at the walls before scrubbing them, the tiles looked clean! Obviously, not so much.
If you don't mind putting in a little scrubbing power, this is an effective and inexpensive cleaner.
.JPG)
Tub Scrub
Baking soda
Liquid soap
Essential oil with antibacterial properties (peppermint, rosemary, tea tree or eucalyptus)
Water
My mixture contained 1/2 cup baking soda, 1 teaspoon liquid dish soap, 6 drops of peppermint oil and about 7 teaspoons of water (enough to make a paste but not be too soupy). Scoop it up on your scrub brush and get to work!
Friday, December 7, 2012
"Christmas is coming, the goose is getting fat..."
No, there will not be a goose on my table at Christmas. There will, however, be a delicious ham and maybe salmon, too!
I love planning elaborate holiday meals. Spending most of my evenings cooking for one or two, I don't often have the chance to plan and prepare a large meal with one or two main courses, several sides and a couple of dessert options. This is the time of year I love when it comes to cooking.
When it comes to Thanksgiving and Christmas, I like to prepare different meals - what is the fun of preparing two feasts only a month apart if they are going to be exactly the same? You with me on this one?
I found a pin on Pinterest with instructions for cooking the ham in a crock pot, rather than the oven. Thoughts? I do sort of love that crisped edge of the ham when it's been baking in the oven for several hours, but a crock pot would free up precious oven space for other baking needs.
As the planning begins, here is what I am considering for my Christmas meal this year, which will again be shared with local friends as none of us are traveling:
- Brown sugar and pineapple spiral ham
- Ginger and soy-glazed salmon (similar)
- Twice baked Yukon gold potatoes
- Lemon grilled asparagus
- Roasted broccoli
- Braided apple bread or pull-apart cinnamon sugar bread
- Chocolate or gingerbread cake roll (similar to Libby's pumpkin roll)
How about you? What are you planning for the next big holiday meal? Here's to happy holidays and a snowy winter ahead!

Monday, December 3, 2012
I love a simple dinner

A small glass of white wine, a chicken Caesar salad and garlic butter crescent rolls. Just right.
Saturday, December 1, 2012
Gobble 'til you Wobble
Happy post-Thanksgiving everyone! I hope the first big holiday meal of the season was a delicious success! Settle in guys, because this post is a long one.
I really love Thanksgiving. I've heard some grumbles that it's a lot of effort for what ends up being more or less just a big family dinner - that the holiday isn't as special as some others. No, there are not gifts like at Christmas or Hanukkah. No baskets overflowing with colorful confections like at Easter. It's just family and friends. But you know what? I think that's a gift in itself.
Winter is such a cozy time and there's something so comforting about it to me. Thanksgiving is a warm welcome to this rush of holidays and helps me get settled in for the season that lies ahead.
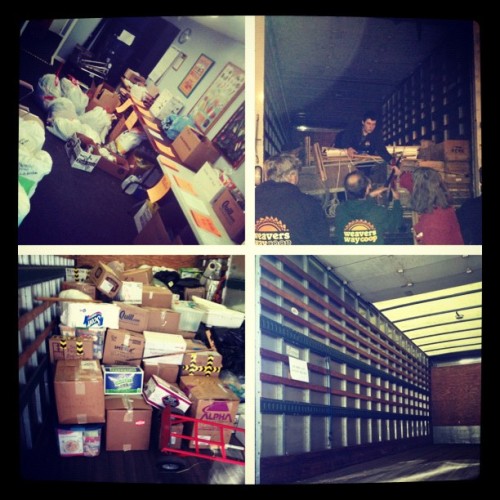
 The unofficial launch of the season for me what when I worked with my my co-op to begin a donation drive for Hurricane Sandy victims. We spent a week accepting item donations, packed a truck, and headed to New Jersey the Saturday before Thanksgiving. At the distribution site, we were met by a few other volunteers who amazingly helped unload boxes that filled nearly half of a 20-foot delivery truck and carry the items to the second floor of the building. Everyone one was so incredibly generous and supportive of the cause, and I can't think of a better way to extend thanks and gratitude and friendship.
It seems that many of my friends and I have come to settle in Philadelphia - away from many of our families - for a number of education or employment related reasons. Despite far-away families, we don't let this stop our holiday fun. Enter Orphan Thanksgiving and Orphan Christmas. We throw together a potluck style holiday feast. Who cares if there are multiples of any one type of food - the idea is that everyone brings his or her favorite part of the holiday meal with family.
In the past, there haven't been enough of us for cooking and entire Turkey Day bird, but this year...this was the year. Not only was it our first ever Orphan Thanksgiving turkey, it was my first ever turkey. And I've got to tell you - if I'm going to cook an entire bird, well, I'm doing it the right way, damn it!
I belong to the Weaver's Way Co-op in my neighborhood. Every year before holiday season rolls in, an email for turkey orders is circulated. There are several options of free-range, organic, local and/or kosher turkeys. A friend of mine was telling me the story of how one year, a co-worker who also was the operator of a small turkey farm asked her if she'd like to order her Thanksgiving turkey from him. She decided to try it, and she's never purchased a traditional store-bought turkey since. She also gave me her secret - brine that bird.

My prized bird was a 10-12 pound turkey from Esbenshade Turkey Farm in Paradise, PA. It was local, farm-raised, reasonably priced and from the oldest turkey farm in our country! This farm has been a source for fresh turkeys since 1858, if you can believe that. I like a company with a good history! I picked it up from a refrigerated truck parked outside the co-op a couple of days before Thanksgiving. On Wednesday afternoon, Ash and I went to NYC to see the Macy's Thanksgiving Day Parade balloons begin to take shape.
 When we finally made our way home from the train station, it was midnight. But, with a turkey needing to be brined, there was no rest for the weary. I picked up a brining instructional sheet from the co-op when I picked up my turkey, and loosely followed the instructions. I'm always a little conservative with salt measurements, so I used far less than was recommended.
Brine:
Brine bag(s)
Bucket or large cooler
Sea Salt
Filtered water
Fresh herbs (thyme)
I prepared the brine by double layering two large oven bags inside a large cooler. The temperature was dipping into the low 30s overnight, so I planned to leave the cooler on the deck behind my apartment overnight. In the bag, I poured several pitchers of filtered water, and about 1/4-1/3 cup of sea salt. I stirred the room temperature water and the salt together until the salt began to dissolve. Then I added a handful of fresh thyme. Finally, I placed the turkey (with the guts removed from the cavity) into the bags. I tied up the inside layer of the bag, and then the outside, closed the lid and put the turkey to bed outside for the night. It was suggested to brine the turkey for about 12 hours, and by the time I took it out of the brine bath in the morning to prep it for roasting, it had been about 10-11 hours.
Thursday morning, I removed the turkey from the brine and placed it on the roasting rack breast-up while I began preparing it.
Turkey Prep:
Olive oil in a misting canister
Garlic (minced, from a jar)
White wine (Pinot Grigio)
Vegetable bouillon (Better Than Bouillon paste)
Fresh herbs (thyme)
Water
 The turkey prep was fairly quick and I had it in the oven beginning to roast in about 30 minutes. First, I misted the entire bird with extra virgin olive oil - a healthier option than butter and it would help the skin crisp to perfection. Then I spooned (just a regular cereal spoon) pre-minced garlic from a jar (time saver!) onto the turkey and spread it around. I also put a spoonful in the breast cavity. I love the flavor of fresh thyme with poultry, so even though there was thyme in the brine bath, I placed more fresh time all over the surface of the turkey and several sprigs in the cavity as well. The vegetable bouillon paste adds an excellent flavor to so many foods - I use it in cream of broccoli soup, chicken soup, rice, etc. I put a spoonful in the cavity and also mixed a couple of spoonfuls with 1-1.5 cups of filtered water and poured it in the bottom of the roasting pan. Finally, I poured the white wine into the cavity. As the bird cooked, I added a little more wine about twice. Together, the vegetable broth (made of the paste and water) and the wine created a really nice basting liquid. There was no special insight into the type of wine I used. Really, it was due to a mistake - I prefer to drink sauvignon blanc and picked up the pinot by mistake, so rather let it sit in the fridge forever, I've been using it for cooking.
I made a foil covering for the bird and kept it loosely covering the turkey on the roasting pan for about two-thirds of the roasting time. I removed it for the last 1-1.5 hours of roasting time. The oven temperature was set to 350º and the 10-12 pound bird took about 4 hours to roast, bringing the internal temperature of breast and legs to 175º.
The bird was a total hit - everyone loved the flavor of the meat and the brining absolutely was key - no dry meat!
I really love Thanksgiving. I've heard some grumbles that it's a lot of effort for what ends up being more or less just a big family dinner - that the holiday isn't as special as some others. No, there are not gifts like at Christmas or Hanukkah. No baskets overflowing with colorful confections like at Easter. It's just family and friends. But you know what? I think that's a gift in itself.
Winter is such a cozy time and there's something so comforting about it to me. Thanksgiving is a warm welcome to this rush of holidays and helps me get settled in for the season that lies ahead.
 The unofficial launch of the season for me what when I worked with my my co-op to begin a donation drive for Hurricane Sandy victims. We spent a week accepting item donations, packed a truck, and headed to New Jersey the Saturday before Thanksgiving. At the distribution site, we were met by a few other volunteers who amazingly helped unload boxes that filled nearly half of a 20-foot delivery truck and carry the items to the second floor of the building. Everyone one was so incredibly generous and supportive of the cause, and I can't think of a better way to extend thanks and gratitude and friendship.
It seems that many of my friends and I have come to settle in Philadelphia - away from many of our families - for a number of education or employment related reasons. Despite far-away families, we don't let this stop our holiday fun. Enter Orphan Thanksgiving and Orphan Christmas. We throw together a potluck style holiday feast. Who cares if there are multiples of any one type of food - the idea is that everyone brings his or her favorite part of the holiday meal with family.
In the past, there haven't been enough of us for cooking and entire Turkey Day bird, but this year...this was the year. Not only was it our first ever Orphan Thanksgiving turkey, it was my first ever turkey. And I've got to tell you - if I'm going to cook an entire bird, well, I'm doing it the right way, damn it!
I belong to the Weaver's Way Co-op in my neighborhood. Every year before holiday season rolls in, an email for turkey orders is circulated. There are several options of free-range, organic, local and/or kosher turkeys. A friend of mine was telling me the story of how one year, a co-worker who also was the operator of a small turkey farm asked her if she'd like to order her Thanksgiving turkey from him. She decided to try it, and she's never purchased a traditional store-bought turkey since. She also gave me her secret - brine that bird.
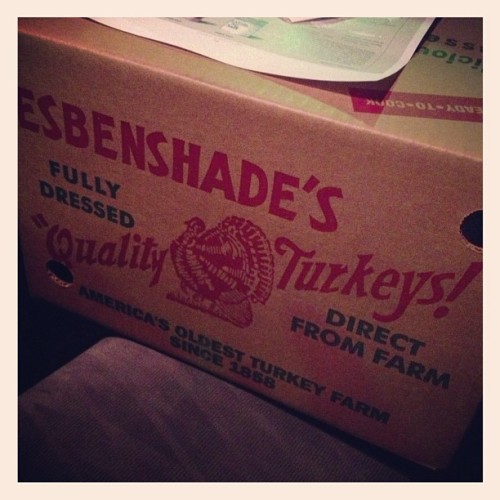
My prized bird was a 10-12 pound turkey from Esbenshade Turkey Farm in Paradise, PA. It was local, farm-raised, reasonably priced and from the oldest turkey farm in our country! This farm has been a source for fresh turkeys since 1858, if you can believe that. I like a company with a good history! I picked it up from a refrigerated truck parked outside the co-op a couple of days before Thanksgiving. On Wednesday afternoon, Ash and I went to NYC to see the Macy's Thanksgiving Day Parade balloons begin to take shape.

Brine:
Brine bag(s)
Bucket or large cooler
Sea Salt
Filtered water
Fresh herbs (thyme)
I prepared the brine by double layering two large oven bags inside a large cooler. The temperature was dipping into the low 30s overnight, so I planned to leave the cooler on the deck behind my apartment overnight. In the bag, I poured several pitchers of filtered water, and about 1/4-1/3 cup of sea salt. I stirred the room temperature water and the salt together until the salt began to dissolve. Then I added a handful of fresh thyme. Finally, I placed the turkey (with the guts removed from the cavity) into the bags. I tied up the inside layer of the bag, and then the outside, closed the lid and put the turkey to bed outside for the night. It was suggested to brine the turkey for about 12 hours, and by the time I took it out of the brine bath in the morning to prep it for roasting, it had been about 10-11 hours.
Thursday morning, I removed the turkey from the brine and placed it on the roasting rack breast-up while I began preparing it.
Turkey Prep:
Olive oil in a misting canister
Garlic (minced, from a jar)
White wine (Pinot Grigio)
Vegetable bouillon (Better Than Bouillon paste)
Fresh herbs (thyme)
Water
 The turkey prep was fairly quick and I had it in the oven beginning to roast in about 30 minutes. First, I misted the entire bird with extra virgin olive oil - a healthier option than butter and it would help the skin crisp to perfection. Then I spooned (just a regular cereal spoon) pre-minced garlic from a jar (time saver!) onto the turkey and spread it around. I also put a spoonful in the breast cavity. I love the flavor of fresh thyme with poultry, so even though there was thyme in the brine bath, I placed more fresh time all over the surface of the turkey and several sprigs in the cavity as well. The vegetable bouillon paste adds an excellent flavor to so many foods - I use it in cream of broccoli soup, chicken soup, rice, etc. I put a spoonful in the cavity and also mixed a couple of spoonfuls with 1-1.5 cups of filtered water and poured it in the bottom of the roasting pan. Finally, I poured the white wine into the cavity. As the bird cooked, I added a little more wine about twice. Together, the vegetable broth (made of the paste and water) and the wine created a really nice basting liquid. There was no special insight into the type of wine I used. Really, it was due to a mistake - I prefer to drink sauvignon blanc and picked up the pinot by mistake, so rather let it sit in the fridge forever, I've been using it for cooking.
I made a foil covering for the bird and kept it loosely covering the turkey on the roasting pan for about two-thirds of the roasting time. I removed it for the last 1-1.5 hours of roasting time. The oven temperature was set to 350º and the 10-12 pound bird took about 4 hours to roast, bringing the internal temperature of breast and legs to 175º.
The bird was a total hit - everyone loved the flavor of the meat and the brining absolutely was key - no dry meat!
Monday, November 26, 2012
Super Sides: Pinterest Potatoes
I love Pinterest. No surprise there, right? It's a given - kind of like saying I love coffee. I need coffee. I can't live if I don't have my daily dose of morning caffeine. Okay, back on track.
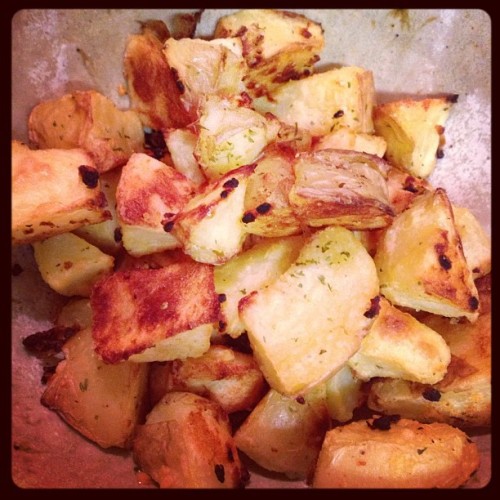
While browsing the food and drink section of Pinterest, I came across a recipe to oven roasted potatoes. It sounded good. Really good. Like, as soon as I read it I wanted to reach through my computer screen with a fork good. The recipe was given rave reviews by other pinners as well. Now, Pinterest can be a fickle place. You might try something and end up with amazing results, or you might try something and wonder how anyone in their right mind thought that was a good idea to even do in the first place, let alone share with millions of people. But this...this recipe I was trying.
The recipe was already adapted from the original, and I adapted it a bit more to my liking and needs as well. Since you can follow the link to the original source, I'm posting the recipe as adapted by me.
What you need:
Olive oil
Yukon gold potatoes
Garlic (minced)
Parsley (or other seasonings)
Salt
Grated Parmesan or Romano cheese
What you do:
Scrub your potatoes and place in a pot with enough water to cover them. Boil the potatoes until tender when pierced with a fork or sharp knife. I left the skin on my potatoes. Once tender, remove the potatoes from the water and let them cool. After they have cooled, slice into chunks.
In a medium sized bowl, pour one to two tablespoons of olive oil, a desired amount of minced garlic (I cheat and scoop a spoonful of pre-minced garlic from a jar), and a dash of salt. Add the potato chunks and mix with your hands until the potatoes are fully coated in olive oil and minced garlic.
Spray a baking sheet with olive oil and spread the potato chunks on the baking sheet. Then sprinkle with dried parsley and the grated cheese. Put in a pre-heated 425-degree oven and bake for 30-40 minutes. Halfway through cooking time, turn the potatoes so that all sides get cooked to a golden brown.

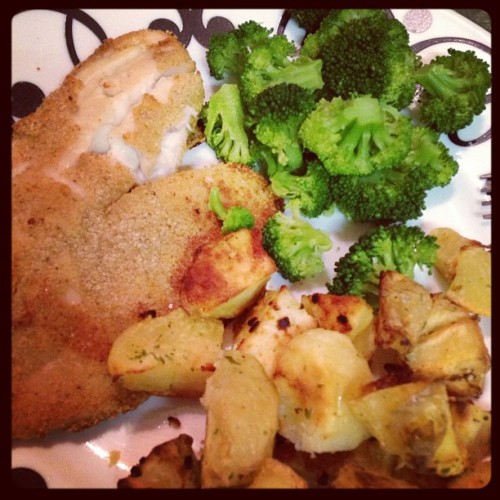
The potatoes came out great - they were even boyfriend approved, and he usually prefers twice baked potatoes. Tonight they were a side to parmesan breaded tilapia and broccoli...perfect! These potatoes will definitely be making an appearance at the dinner table again, maybe next time with bacon like in the original recipe.

While browsing the food and drink section of Pinterest, I came across a recipe to oven roasted potatoes. It sounded good. Really good. Like, as soon as I read it I wanted to reach through my computer screen with a fork good. The recipe was given rave reviews by other pinners as well. Now, Pinterest can be a fickle place. You might try something and end up with amazing results, or you might try something and wonder how anyone in their right mind thought that was a good idea to even do in the first place, let alone share with millions of people. But this...this recipe I was trying.
The recipe was already adapted from the original, and I adapted it a bit more to my liking and needs as well. Since you can follow the link to the original source, I'm posting the recipe as adapted by me.
What you need:
Olive oil
Yukon gold potatoes
Garlic (minced)
Parsley (or other seasonings)
Salt
Grated Parmesan or Romano cheese
What you do:
Scrub your potatoes and place in a pot with enough water to cover them. Boil the potatoes until tender when pierced with a fork or sharp knife. I left the skin on my potatoes. Once tender, remove the potatoes from the water and let them cool. After they have cooled, slice into chunks.
In a medium sized bowl, pour one to two tablespoons of olive oil, a desired amount of minced garlic (I cheat and scoop a spoonful of pre-minced garlic from a jar), and a dash of salt. Add the potato chunks and mix with your hands until the potatoes are fully coated in olive oil and minced garlic.
Spray a baking sheet with olive oil and spread the potato chunks on the baking sheet. Then sprinkle with dried parsley and the grated cheese. Put in a pre-heated 425-degree oven and bake for 30-40 minutes. Halfway through cooking time, turn the potatoes so that all sides get cooked to a golden brown.
The potatoes came out great - they were even boyfriend approved, and he usually prefers twice baked potatoes. Tonight they were a side to parmesan breaded tilapia and broccoli...perfect! These potatoes will definitely be making an appearance at the dinner table again, maybe next time with bacon like in the original recipe.
Tuesday, November 20, 2012
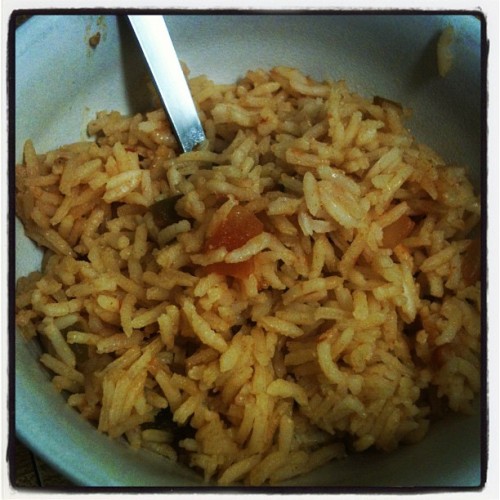
Super Sides: Mexican Rice
Forget Taco Tuesday. I am down for Mexican night any night of the week. Given my love of that South of the Border flavor, you are almost always guaranteed to find salsa in my fridge and taco seasoning in my spice cabinet. There is also always a healthy supply of Basmati rice, too. Put the three together and you get a Super Side: Mexican Rice. I found this recipe on Pinterest, originally from The Tidy Nest.
This recipe is incredibly easy and requires ingredients that, like me, you probably already have in your fridge or cabinets.
What you need:
1 cup uncooked rice
2 cups chicken broth (or water with bouillon added)
1 tablespoon butter or cooking oil
1/2 cup salsa
1 teaspoon powdered garlic
1 teaspoon taco seasoning

What you do:
Toast the dry rice in the pot on low heat for about 4 minutes before adding any ingredients - this opens the pores of the rice grains and allows it to become fluffy when cooked.
After you've toasted the rice, add all of the remaining ingredients. Bring to a boil for 1 minute, then turn heat to low, put a lid on the pot and let cook until all of the liquid is absorbed and the rice is fully cooked.
So easy, right? I used mild salsa and taco season and admittedly, the flavor of the rice was a little lacking. To give it a boost, I added a few splashes of Tapatío hot sauce. To me, this sauce has a lot of heat, so a splash or two goes a long way.
This recipe is incredibly easy and requires ingredients that, like me, you probably already have in your fridge or cabinets.
What you need:
1 cup uncooked rice
2 cups chicken broth (or water with bouillon added)
1 tablespoon butter or cooking oil
1/2 cup salsa
1 teaspoon powdered garlic
1 teaspoon taco seasoning
What you do:
Toast the dry rice in the pot on low heat for about 4 minutes before adding any ingredients - this opens the pores of the rice grains and allows it to become fluffy when cooked.
After you've toasted the rice, add all of the remaining ingredients. Bring to a boil for 1 minute, then turn heat to low, put a lid on the pot and let cook until all of the liquid is absorbed and the rice is fully cooked.
So easy, right? I used mild salsa and taco season and admittedly, the flavor of the rice was a little lacking. To give it a boost, I added a few splashes of Tapatío hot sauce. To me, this sauce has a lot of heat, so a splash or two goes a long way.
Monday, November 5, 2012
Miniature Pumpkin Pies
The weekend before Halloween, I hosted a pumpkin carving party at my apartment. With Hurricane Sandy blowing her way toward the Northeast, we opted to move the party indoors instead of enjoy the crisp fall air and colorful leaves outdoors. I have to admit I'm a little disappointed that Mother Nature created the most beautiful party decorations and we were unable to take advantage. Maybe next year. Inside though, with all of our guests, we were comfy and warm and filling our bellies with some of the best autumn foods before setting to work carving our pumpkins.
The menu included: turkey chili, corn bread (made by a guest), garlic hummus with veggies, chips and salsa, pumpkin chocolate chip cookies, spring rolls (made by a guest), caramel covered apple bites, home-brewed pumpkin beer and my favorite: miniature pumpkin pies with freshly whipped heavy cream.
When it comes to pumpkin pie or pumpkin roll, I always turn to Libby's for a guaranteed good recipe. The pumpkin pie recipe is posted online as follows:
3/4 cup granulated sugar
1 tsp ground cinnamon
1/2 tsp salt
1/2 tsp ground ginger
1/4 tsp ground cloves
2 large eggs
1 can (15 oz) pumpkin puree
1 can (12 oz) evaporated milk
The directions are incredibly simple, and Libby's rates the recipe level as "easy:"
In a small bow, mix sugar, cinnamon, salt, ginger and cloves. In a separate, large bowl, beat the eggs. Stir the pumpkin and the sugar-spice mixture into the large bowl. Slowly stir in the evaporated milk.
Easy? They weren't kidding.
All that's left to do is pour the pie filling mixture into the pie shell and bake. The recipe recommends a 9-inch unbaked pie shell with a 4-cup volume, but I was making an easy-to-eat dessert for a party with 9 adult guests and a 4-year-old. To accomplish that, I found Keebler's miniature graham cracker pie crusts. Not traditional for pumpkin pie, but everyone loved the graham cracker crust. I made a dozen miniature pies, and had extra pie filling left.
Baking instructions are to preheat the oven to 425 for 15 minutes, then reduce the heat to 350. Bake the pie for 40-50 minutes and cool on a wire rack for 2 hours.
Given that my party preparation time for making the food was a little tight, I skipped the preheat time and baked the pies at 400 until they were done. They came out juuuust fine. Also, instead of the individual measurements of separate spices, I added 2 tsp of pumpkin pie spice.
To make freshly whipped cream, I put a metal bowl and the beaters for an electric hand mixer in the freezer for about 15 minutes. I'm sure there's a kitchen-science reason for this, but I do it for the reason a lot of us probably do many things in the kitchen: "because that's how mom always did it." When the bowl and beaters are cold, pour heavy cream into the bowl and beat on high until it turns from liquid into a firm but fluffy consistency - whipped cream!
I really loved having the mini pies as opposed to one large pie. They were the perfect serving size for one person, were in their own foil pie tins so no need for an extra plate, and they make sending leftovers home with guests easy as...pie!

Wednesday, October 3, 2012
The $7 Savior
Ever have those nights when you're just not interested in cooking dinner? Oh I know - me either. That's crazy talk.
Real talk now. We all have those nights. There are plenty of convenient foods available, but I've got to be honest. I feel ashamed of myself if I'm caught with a Wendy's bag. And pizza, well, that's not super friendly for the health conscious among us.
If you'd like your meal to maintain some semblance of being home-cooked, that's where the "$7 Savior" comes in. My neighborhood grocery store sells freshly made rotisserie chickens for just under $7 and they sure do the trick.
Of course you can eat the chicken with some homemade sides, like asparagus sauteed in olive oil and lemon juice, garlic bread, a small salad, etc., I like to get a bit creative with my rotisserie chicken meals.
Here are my top three:
1. Chicken Soup
This one is slightly more time intensive, but is absolutely worth it. Here is a detailed recipe for perhaps the easiest chicken soup you'll ever make (no, opening a can does not count). Basically, saute your garlic and onions, add water and Better than Bouillon, chop and add the rest of your veggies and your pulled apart rotisserie chicken (no bones). Heat until the veggies soften and there's dinner.
2. Chicken Nachos
This is a great appetizer to get when you go out to dinner with friends, but why wait for that occasion? Spread your tortilla chips on a baking sheet, pull apart some of the breast meat from the rotisserie chicken and stop the chips with shredded cheese. I like to keep my nachos simple - just chicken, cheese and salsa - but the toppings options are numerous. I add the salsa to my nachos after they come out of the oven.
3. Salad
Salads are great, but not always filling. When I buy a rotisserie chicken, I almost always get about 4 meals out of one chicken, and a couple of them are usually salads. It's a great, easy, quick option for me to prepare for lunch at work. Just pull apart some of the rotisserie chicken and add it to your greens and whatever other veggies make your salad complete, then pack your salad dressing, croutons, etc. separately.
So the next time you're looking for a time saver in the kitchen, don't think twice about calling on the $7 Savior. You'll could be eating easy, inexpensive and healthy meals in no time!
Tuesday, July 17, 2012
Just throw it together
I'm due for a grocery shopping trip...one of the big guys. I recently implemented a budget for myself and I allotted $50/week for groceries. Since I've gotten sloppy with the grocery shopping as of late, I end up making several last minute trips to the grocery store during the week. While I'm not quite sure how it all adds up, I know it adds up. So the plan is to try to make one shopping trip for the main items, and if need be, stop back one more time for fresh items like produce or dairy. By shopping once a week (rather than bi-weekly or monthly), I should be able to make it without that second trip. I restart my budget every Friday, so that I can begin the week with my grocery shopping trip on the weekend. Other than an unexpected (and somewhat expensive) trip to the vet, things seem to be going okay for the most part. I did get off track last week, but tomorrow is Friday (and payday! and 1 month from starting the budget project) so I'll begin my budget anew.
Now onto the food...
Over the weekend I picked up ingredients for pita pizzas, which Ash and I made for dinner on Sunday. The pizzas are great - around 400 calories for a traditional white pocketless pita with a little olive oil, seasoned pizza sauce, mozzarella cheese, Italian blend cheese and black olives. I also had a container of brussel sprouts I bought toward the end of last week. Usually I buy brussel sprouts from my co-op - they have a large bin and you scoop out individual brussel sprouts, taking just the right amount for you. The store is undergoing renovations right now, and the pop-up produce market outside was all out of my veggie. I ended up having to purchase a carton of them at the grocery store, and it contained a far larger quantity than I needed, so I've been eating them most nights for dinner in an effort to use 'em up and not waste. So last night's dinner was a combination of extra ingredients I had in the fridge, and it ended up making the perfect dinner - just under 500 calories and using up my leftovers so they don't get wasted.

For the pizza, I spritzed the pita with olive oil, sprinkled on garlic powder, added about two tablespoons of sauce, the cheese and the olive slices. I washed and cut the brussel sprouts (cut the end nub off and then cut them in half), sprayed with my olive oil mister, sprinkled on some garlic powder and baked in the oven with my pizza at 425 for about 30 minutes. Done and done. And yum!
Now onto the food...
Over the weekend I picked up ingredients for pita pizzas, which Ash and I made for dinner on Sunday. The pizzas are great - around 400 calories for a traditional white pocketless pita with a little olive oil, seasoned pizza sauce, mozzarella cheese, Italian blend cheese and black olives. I also had a container of brussel sprouts I bought toward the end of last week. Usually I buy brussel sprouts from my co-op - they have a large bin and you scoop out individual brussel sprouts, taking just the right amount for you. The store is undergoing renovations right now, and the pop-up produce market outside was all out of my veggie. I ended up having to purchase a carton of them at the grocery store, and it contained a far larger quantity than I needed, so I've been eating them most nights for dinner in an effort to use 'em up and not waste. So last night's dinner was a combination of extra ingredients I had in the fridge, and it ended up making the perfect dinner - just under 500 calories and using up my leftovers so they don't get wasted.
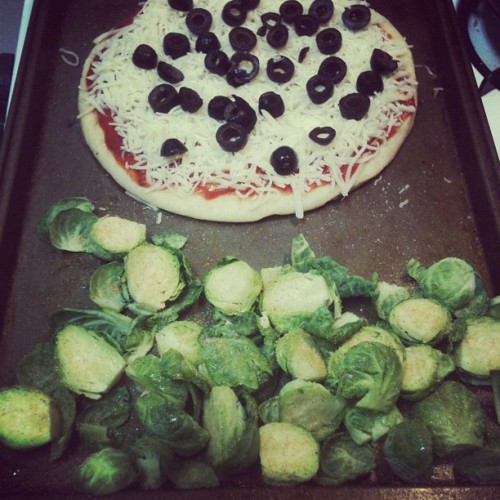
For the pizza, I spritzed the pita with olive oil, sprinkled on garlic powder, added about two tablespoons of sauce, the cheese and the olive slices. I washed and cut the brussel sprouts (cut the end nub off and then cut them in half), sprayed with my olive oil mister, sprinkled on some garlic powder and baked in the oven with my pizza at 425 for about 30 minutes. Done and done. And yum!
Thursday, June 7, 2012
Growing Dinner
We've had all sorts of wonderful rain storms lately - so that stay the entire day, others that roll in and out without warning, some with rumbles of thunder and flashes of lightning. It's doing wonders for my garden.
Last night I cut these beautiful bunches of greens, freshly washed off my a passing storm.

And then I made this delightful chicken Caesar salad. The chicken is from a local farm - free range and no antibiotics. Just cooked with a little olive oil and garlic. Add some halved grape tomatoes, croutons, a little shredded mozzarella (I forgot the shaved parmesan...I'm good at forgetting), and light Caesar dressing. And that's dinner...filling yet light and fresh.

Tuesday, June 5, 2012
Here, Piggy Piggy
For someone who grew up a Carolina girl, I discovered the delicious pulled pork sandwich late in life. I always knew it was there, hanging out at every BBQ joint in town, but never did my taste buds say "Yo, sister - we need that!" Then one fateful October night when I was in college, I found myself walking by the pulled pork stand at the North Carolina State Fair. I paused, pondered, and took the first step toward happiness: I got in line. I loved that sandwich so much, the next night I got another.
I've made pulled pork in a crock pot 3 or 4 times over the past year or so, and each time the flavor has been a little bit different, but always good.

I used a cut of pork called a "Boston butt," which had the bone in and a layer of fat on the bottom of the cut of meat. When making pulled pork in a crock pot, you do want some amount of fat on the meat to add a little flavor while the meat is slow cooking.
The next step was a little crazy - I opened the spice cabinet and started digging through, pulling out this and that and dumping whatever amount spoke to me into a mixing bowl. The mix contained cayenne pepper, chili powder, paprika, onion powder, garlic powder, sea salt, cumin, coriander...and I think that may be it. Like I said, it was a bit of a tornado-in-the-kitchen moment. Once mixed together, I rubbed the mixture all over the cut of meat and let it sit for a few minutes. This time, I did not brown the meat before cooking, and I think it was for the better.
I forgot to pick up a yellow onion at the grocery store, but luckily I keep a bag of Trader Joe's pearl onions in the freezer (they sell the most useful products!). In a little olive oil and a couple tablespoons of evaporated cane sugar, I sauteed the onions until they became caramelized, then put them in the crock pot. Ash and I looked through the various stouts he picked up at a little by-the-bottle beer convenience store (in PA, you otherwise have to buy beer by the case from a distributor). We chose three, poured them in the crock pot over the chunk of pig, and added a Blue Moon because we needed a little more liquid. I also added about half a jar of McCutcheon's BBQ sauce and a healthy dose of Cotton Honey straight from North Carolina. It's a great sauce with real, fresh ingredients. Finally, I threw in a couple of bay leaves. Usually I add fresh thyme, but /i forgot that, too...oops!
The pig was cooking by noon and we ate around 9 that night. Half to three-quarters of the time, the crock pot was set to "high" and the rest of the time it was set to "low." The meat pulled apart amazingly and we shredded it into fine pieces. I added a little of the "juice" and a dash of salt and then piled it on toasted potato rolls. Ash made all sorts of sauce concoctions to mix with his shredded pork. I definitely tasted a bit of heat from the cayenne pepper but it was just the right amount.
The next day I reheated some of the meat to have a sandwich for lunch and I swear it was even better than the day it was first cooked. I tasted a little more spiciness and a bit more flavor overall (I added a little of the juice to the meat before storing it in the fridge).
Honestly, the worst part of this process is the clean-up. Prep is easy, and cooking is almost effortless, since the crock pot does it all for you. This is a great meal to prepare for your own family, or something great to prepare the day before and bring to a potluck or cook-out. Nobody will be disappointed!
Sunday, May 27, 2012
Review: Eco-friendly Palm Leaf Plates
I was recently provided the opportunity by Marx Foods to review their Palm Leaf Plates, listed online as "eco-friendly" and "disposable." While Marx Foods has provided these plates free for my review, the following written opinions are solely my own based on my experience while using Palm Leaf Plates.
To get a little background information for what I am reviewing, I went to the Marx Foods website to look at the variety of plates offered, read about how they are made, and most importantly (for many people) - checked pricing.
Now, pardon me while I get a little nerdy. Given my background in environmental science and my respect for the land and sea, something new I learned and absolutely love is that these plates are made from palm leaves that have already fallen from the tree. The Adaka (or Adakka or areca nut) palm trees are not cut down, palm fronds are not cut from the trees - there is no deforestation or stripping of the trees. Tree huggers, rejoice! The collected leaves are rinsed in water, hand-washed in water and turmeric (that's right - the spice), rinsed once more in water, then allowed to air dry. In order to maximize resources, various shapes of plates and bowls are cut from each stretched and flattened palm leaf, and then heat pressed into shape. Pretty cool, right? I'd be interested in learning a little more about where the leaves are collected (the mighty Internet tells me these trees are found in the tropical Pacific, Asia and India), if fair trade/fair wages are involved in employing local residents, etc.
Just how durable are these plates? I used my plates to serve hearty helpings of teriyaki chicken and broccoli over udon noodles. The teriyaki sauce is thick and in excess, so some sauce puddles on the bottom of the plates. The plates are thicker than your standard paper plate and have a feeling similar to that of corn husks.


So how about cost? These plates will empty your wallet a little faster than purchasing their paper or plastic counterparts. A standard dinner size plate (9.5 inches x 9.5 inches) in a pack of 25 plates is sold for $34 and a pack of 100 plates is sold for $77. Packages of salad plates (6.75 inches x 6.75 inches) sell for $31 (25 plates) and $69 (100 plates). As with most products that are harvest and produced in a sustainable and fair manner, your price supports far more than the tangible product you hold in your hand. Similarly, the cheap price you pay for traditional foods and products excludes the environmental cost the production of that food or product has on our environment and resources. While I can say for certain that I would not be willing to purchase these plates every time I have a backyard BBQ, I would certainly consider them for other special occasions. They would be great for a rustic or country themed wedding, particularly when compared to the cost of rentals, a fun little wine and cheese party with your girlfriends, to carry a shared dish to a potluck, etc. Sadly, these plates aren't made to be re-used, so that makes the cost hurt a bit more.
Overall, the palm leaf plates are durable in the sense that they don't leak, but depending on the heat of the food, the plates may warp a little. The cost is higher than the typical disposable product, but is created in a far more sustainable manner. Since palm leaf plates are compostable, I rinsed the excess sauce from the plates, and into the compost they'll go in the morning. I'm eager to see how long they last before beginning to break down!
To get a little background information for what I am reviewing, I went to the Marx Foods website to look at the variety of plates offered, read about how they are made, and most importantly (for many people) - checked pricing.
Now, pardon me while I get a little nerdy. Given my background in environmental science and my respect for the land and sea, something new I learned and absolutely love is that these plates are made from palm leaves that have already fallen from the tree. The Adaka (or Adakka or areca nut) palm trees are not cut down, palm fronds are not cut from the trees - there is no deforestation or stripping of the trees. Tree huggers, rejoice! The collected leaves are rinsed in water, hand-washed in water and turmeric (that's right - the spice), rinsed once more in water, then allowed to air dry. In order to maximize resources, various shapes of plates and bowls are cut from each stretched and flattened palm leaf, and then heat pressed into shape. Pretty cool, right? I'd be interested in learning a little more about where the leaves are collected (the mighty Internet tells me these trees are found in the tropical Pacific, Asia and India), if fair trade/fair wages are involved in employing local residents, etc.
Just how durable are these plates? I used my plates to serve hearty helpings of teriyaki chicken and broccoli over udon noodles. The teriyaki sauce is thick and in excess, so some sauce puddles on the bottom of the plates. The plates are thicker than your standard paper plate and have a feeling similar to that of corn husks.

The first thing that I noticed was, while the plate held the weight of the meal, it began to buckle when I picked it up with one hand. My guess is that because the food was hot, the heat caused that to happen.

By the end of the meal, the plate was still in tact, and none of the sauce seeped through.


As my boyfriend - who works in industrial design - noted when he began to peel apart one of the plates, the creases in the plate are all oriented in the same direction. The interpretation here is that if the palm leaves were stacked in multiple directions prior to heat pressing (think of the way plywood/pressboard is made), they may be less likely to buckle. Since we are certainly not experts in the design or production of these plates, this is purely an educated guess.
To fill another curiosity, I decided to put a small palm leaf plate under one of my house plants to serve as a tray for excess water. These plates aren't necessarily designed to hold water, but I decided to test it anyway! The plate did warp (as expected from the information provided on the Marx Foods website), but did not leak.


So how about cost? These plates will empty your wallet a little faster than purchasing their paper or plastic counterparts. A standard dinner size plate (9.5 inches x 9.5 inches) in a pack of 25 plates is sold for $34 and a pack of 100 plates is sold for $77. Packages of salad plates (6.75 inches x 6.75 inches) sell for $31 (25 plates) and $69 (100 plates). As with most products that are harvest and produced in a sustainable and fair manner, your price supports far more than the tangible product you hold in your hand. Similarly, the cheap price you pay for traditional foods and products excludes the environmental cost the production of that food or product has on our environment and resources. While I can say for certain that I would not be willing to purchase these plates every time I have a backyard BBQ, I would certainly consider them for other special occasions. They would be great for a rustic or country themed wedding, particularly when compared to the cost of rentals, a fun little wine and cheese party with your girlfriends, to carry a shared dish to a potluck, etc. Sadly, these plates aren't made to be re-used, so that makes the cost hurt a bit more.
Overall, the palm leaf plates are durable in the sense that they don't leak, but depending on the heat of the food, the plates may warp a little. The cost is higher than the typical disposable product, but is created in a far more sustainable manner. Since palm leaf plates are compostable, I rinsed the excess sauce from the plates, and into the compost they'll go in the morning. I'm eager to see how long they last before beginning to break down!
Tuesday, May 22, 2012
Chicken teriyaki udon noodles
Do you have a favorite recipe that you feel like you could eat almost every day? I have definitely found mine. Browsing recipes online, I came across Caramelized Baked Chicken Wings on Cathy's Kitchen Journey. The flavor of this wing sauce is superb. I do generally love stir fry and teriyaki sauce, but this steps it up a notch, and I love that it's comprised of fairly standard pantry ingredients.
I've made some adaptations to the original recipe, which are as follows (makes enough sauce for 2-3 servings):
I've made some adaptations to the original recipe, which are as follows (makes enough sauce for 2-3 servings):
- 1/3 cup of low sodium soy sauce
- 1 tablespoon of honey
- 1 tablespoon of ketchup
- 1 teaspoon of extra virgin olive oil
- 1 teaspoon of minced garlic (I use pre-minced, from a jar)
- 1/2 teaspoon of ginger paste
- 1/2 teaspoon of cornstarch (to thicken)
Combine all of the above ingredients in a saucepan (my measurements are more of the "eyeball" type rather than exact) and heat, stirring with a fork or whisk, until the sauce becomes bubbly and begins caramelizing. Heat and stir for about 1-2 minutes more. The prep and cooking time for the sauce is fairly quick, so be sure to time it appropriately with the prep and cooking for the rest of the meal.


Chicken: I cut up about 4 oz. of boneless, skinless chicken breast and cooked over medium heat in a frying pan sprayed with extra virgin olive oil.
Broccoli: I rinsed, cut, steamed and drained the broccoli from one medium-sized broccoli crown.
Udon Noodles: I was originally planning this meal with rice noodles, but my classy neighborhood grocery store doesn't carry rice noodles...I should have known. The last time I bought them, I did so at my co-op, so udon noodles it was. Boil them for about 5 minutes until they are tender, then drain.


Once the chicken was finished cooking, I stirred it in a little bit of the sauce to cover all of the pieces of chicken. First I plated the udon noodles, then the chicken and the broccoli, and finally I poured the remaining sauce over the entire scrumptious pile of food. So delicious.


The full prepared recipe I made was 500 calories. I didn't have a full appetite for dinner, so I ate about half and saved the rest for lunch the next day. It reheated surprisingly well, too.
Monday, May 14, 2012
Sunny Days
What a beautiful weekend we had - sunny and 80 degrees both days. I don't spend time in the gym on weekends, but I had plenty of exercise with all of my outdoor activities.
At the farm on Saturday, we moved all of the tools in the barn and made an area to hang all of the horse blankets for the off-season. God knows how many years' worth of dust I spent up during that! Someone also pulled down a tree in front of the barn, so that had to be moved. I picked up the tree trunk and started walking. It was a small-ish tree...maybe 6-8" in diameter and about 12 feet long...but away I went dragging it around the barn, across the top field, through the gate and all the way down into the middle of the farm until I reached the burn pile. No joke, I probably walked a quarter of a mile with that thing. Then I ran up the hill going back to the gate. Dang. I stopped on the way up to admire this hoof print in the ground:
On a farm that's been established for more than 50 years, there are all sorts of treasures to be found. The one I'm really excited about is an old metal bathtub. I said it would be a great planter for a garden, so Jill said "Take it! It's yours!" Wooooohweeee. I decided we should leave it at the farm, clean it up and plant a pretty garden in it. I can't wait to get started on that project. I went to Home Depot yesterday and bought a steel brush, primer and paint. Once we figure out where to put it (and...uh...how to get it there...), I'll fill it partly with mulch and then soil. I've already decided what plants to put in it, too.
After the treasure hunt, another working student and I brought two of the horses to the outdoor arena. Because these horses stay in a herd, they can get pretty antsy when you separate them. Especially when one of the horses being separated is the boss. Make him leave his boys, and he will be sure you know how unhappy he is about it. We pulled slats from the outdoor arena fence to create a quick-escape in case the horses got too antsy. I walked our new boy Jeffrey up and set him to work right away walking over cavalettis and doing figure-eights through cones. He didn't mind wandering around the new environment at all, and enjoyed some extra snack time. When we decided the boys did a good job and we could stop work on a high note, we walked them out the gate, took off their harnesses, and let them run free. Watching a thoroughbred gallop down a hill is a beautiful thing.
Sunday was no day of rest in my backyard. Mission: build a cat-proof fence. I've been finding some "gifts" left in my vegetable garden by my neighbor's thoughtful cats. Off to Home Depot Ash and I went for all the building materials for a fence and a real-deal gate. Oh yeah...hinges, latch and all! For four hours we worked and worked and worked planting a few new flowers and herbs, pulling weeds, taking down the old fence, putting in posts for the new fence, attaching the new fencing material and finally cleaning up. The last part of the project is building and attaching the gate, but we were running out of daylight and had to stop working for the night. By Wednesday, the garden is going to look fantastic. It already looks so much better. All of the beds were made so neatly this year, and the plants were arranged with adequate spacing and supportive structures. I can't wait until it all fills in. I should have taken some before pictures to do a comparison, but I'll just have to settle for after. I was having an absent-minded moment and could not find the charger with my camera battery of course still in it. How one loses a charger that was last seen plugged into the wall, I will never know. Hopefully I find it tonight.
I hope everyone had a great weekend! Take advantage of all these beautiful spring days!
At the farm on Saturday, we moved all of the tools in the barn and made an area to hang all of the horse blankets for the off-season. God knows how many years' worth of dust I spent up during that! Someone also pulled down a tree in front of the barn, so that had to be moved. I picked up the tree trunk and started walking. It was a small-ish tree...maybe 6-8" in diameter and about 12 feet long...but away I went dragging it around the barn, across the top field, through the gate and all the way down into the middle of the farm until I reached the burn pile. No joke, I probably walked a quarter of a mile with that thing. Then I ran up the hill going back to the gate. Dang. I stopped on the way up to admire this hoof print in the ground:
 |
| How's your luck, buttercup? |
After the treasure hunt, another working student and I brought two of the horses to the outdoor arena. Because these horses stay in a herd, they can get pretty antsy when you separate them. Especially when one of the horses being separated is the boss. Make him leave his boys, and he will be sure you know how unhappy he is about it. We pulled slats from the outdoor arena fence to create a quick-escape in case the horses got too antsy. I walked our new boy Jeffrey up and set him to work right away walking over cavalettis and doing figure-eights through cones. He didn't mind wandering around the new environment at all, and enjoyed some extra snack time. When we decided the boys did a good job and we could stop work on a high note, we walked them out the gate, took off their harnesses, and let them run free. Watching a thoroughbred gallop down a hill is a beautiful thing.
 |
| See you later, Jeffrey. |
I hope everyone had a great weekend! Take advantage of all these beautiful spring days!
Thursday, May 10, 2012
The Journey and the Destination

It's been just over two weeks since I began logging my food and exercise with My Fitness Pal. A year or so ago I tried to participate in a fitness challenge a group of food bloggers did together, but didn't last very long. It was just too difficult to keep legitimate track of anything. The database of food and exercise in MFP is phenomenal.
To give a starting point, here is how I set up my account:
Age: 28
Height: 5'5.5"
Weight: 128.6 (I later changed it to 129.6 when I realized that must have been a fluke w/ my scale)
Goal Weight: 125
Weight Loss Goal per Week: 0.5 pounds (changed to 1 pound based on MFP calculation)
Calorie Goal per Day: 1400 (calculated by MFP; changed to 1200 when adjusting the above category)
As I later learned, MFP calculates a recommended weight loss goal per week, and mine was calculated at 1 pound. When I changed my weekly weight loss goal, my calorie goal per day was adjusted to 1200.
Each day I enter my food and exercise as accurately as possible, and I believe there have only been 1 or 2 days where I have exceeded my calorie goal - all other days I have finished the day under 1200 (or 1400, previously). But, try as I might, my body has not changed one bit (yes...I've been looking at that big, red 0 for two weeks now).
I think there are a few reasons why I haven't had any change. First, I'm not trying to shed tens of pounds. While someone working on a larger weight loss goal may lose the first 5, 10 or even 15 pounds quickly, I'm merely trimming off a few pounds. I've always heard people say the last 5 pounds is the hardest, and that's pretty much all I'm going for, so I may have a tough run of it. That being said, I really shouldn't expect much out of just two weeks.
Next, since because my eating habits have always been pretty much what they are now, I'm not sure that focusing so much on food is going to do much for me. Which brings me to the strongest point: I need to work harder. My big night at the gym is Thursday nights, when I have a 1-hour ballet class followed by 1-hour of Zumba. Ballet is a mix of strength and cardio, and Zumba is about 99% cardio (we hold squats a couple of times during our dances). If I really want to see a difference in the way my body looks (which has been my main goal - I only figured dropping a couple of pounds would come with that as part of the toning process), I need to log more hours at the gym. Maybe another fitness class, but definitely some time spent using the weight machines and a little more cardio to burn fat as I tone up with the weight machines. I do lose calories with some at-home exercises and activities, but I can't imagine that has the same impact as dedicated gym time.
What does all of this mean? Moving into the second part of my first month using MFP, I'm going to put a stronger effort toward gym time. I am lucky to having a flexible work scheduling, allowing me to start my day any time between 9 and 10. That means if I wake up early, I can take care of household business so my evenings are chore-free. Goal number 1: wake up an hour earlier. I also have two pups who are eager for more time outdoors. Goal number 2: get those puppies walking, even if it's just the 3/4 mile loop around the block. If I change into gym clothes and walk the dogs when I get home from work, that means I'll be warmed up and ready to head to the gym. Goal number 3: spend 1-2 more hours in the gym each week.
Tomorrow's Friday and usually a rest day after the long Thursday night at the gym and all the chores at the horse farm on Saturday, so Monday will begin my newly dedicated efforts!
Tuesday, May 8, 2012
100 Calorie Dessert
Dessert: so good, but sometimes so bad. It doesn't have to be! The season for fresh berries is arriving (or has already arrived in some areas) and those sweet little treats make a delicious dessert. Rinse and cut your berries, and top with Cool Whip Light. Instant dessert!

1 cup of mixed berries and 2 tablespoons of Cool Whip Light - only 99 calories!

1 cup of mixed berries and 2 tablespoons of Cool Whip Light - only 99 calories!
500 Calorie Dinner
Since using My Fitness Pal, I'm more aware of the contents of each of my meals - if I have a heavy lunch, I should have a lighter dinner if I don't have time to exercise. Similarly, a lighter lunch leaves room for a heavier dinner. All in all, the key is portion control, which can be difficult when there is a plate of your favorite food in front of you! One of my favorite comfort food dinners is chicken parmesan and it is so simple to make.
Ingredients:
I began with thin sliced boneless skinless chicken breast browned in a cast iron skilled sprayed with olive oil (I love my oil mister!). Once each side was browned, I removed the chicken and dipped it in a beaten egg, then a mixture of bread crumbs (I've also used cracker meal in the past, or a mixture) and grated parmesan-romano cheese. I then placed the breaded chicken breast pieces in a glass baking dish, topped each with a table spoon of Trader Joe's fat free pizza sauce, and then a tablespoon of shredded Italian four cheese blend on each chicken breast slice.
My sides were a piece of Texas toast (since I don't eat bread very often and usually cook for one, it's nice to keep a box of Texas toast in the freezer because I don't always have fresh deli bread otherwise) and brussel sprouts sprayed with olive oil and sprinkled with garlic powder. I slid a cookie sheet with the Texas toast and brussel sprouts into the oven alongside the dish with the chicken, and baked it all at 425 for about 15-20 minutes.

The end result is a full meal that is just over 500 calories: I used about 6 ounces of chicken, sliced 5 brussel sprouts in half, and cooked one piece of Texas toast. Eliminating the Texas toast would cut out 120 calories. Overall, not a bad meal, and it would be especially good after a tough workout at the gym!
Ingredients:
- boneless skinless chicken breast (thin sliced or strips)
- olive oil/cooking spray
- bread crumbs or cracker meal
- grated parmesan-romano cheese
- pasta or pizza sauce
- shredded mozzarella or Italian cheese blend
I began with thin sliced boneless skinless chicken breast browned in a cast iron skilled sprayed with olive oil (I love my oil mister!). Once each side was browned, I removed the chicken and dipped it in a beaten egg, then a mixture of bread crumbs (I've also used cracker meal in the past, or a mixture) and grated parmesan-romano cheese. I then placed the breaded chicken breast pieces in a glass baking dish, topped each with a table spoon of Trader Joe's fat free pizza sauce, and then a tablespoon of shredded Italian four cheese blend on each chicken breast slice.
My sides were a piece of Texas toast (since I don't eat bread very often and usually cook for one, it's nice to keep a box of Texas toast in the freezer because I don't always have fresh deli bread otherwise) and brussel sprouts sprayed with olive oil and sprinkled with garlic powder. I slid a cookie sheet with the Texas toast and brussel sprouts into the oven alongside the dish with the chicken, and baked it all at 425 for about 15-20 minutes.

The end result is a full meal that is just over 500 calories: I used about 6 ounces of chicken, sliced 5 brussel sprouts in half, and cooked one piece of Texas toast. Eliminating the Texas toast would cut out 120 calories. Overall, not a bad meal, and it would be especially good after a tough workout at the gym!
Tuesday, May 1, 2012
My new best friend
If you read that last post, you'll know I've been disgruntled with my eating habits lately. Partially due to following in line with Ashley's habits, but let's be real here - mostly my own fault. I could always prepare myself a separate meal or choose better options when we go out to eat. Now that meal planning is back on track, I'm going to borrow from my cousin and direct you all to her excellent review of an app we're both nuts about - My Fitness Pal.
I've always considered myself to have fairly healthy habits - I make the majority of my own meals, happily eat most fruits and vegetables and have a moderate activity level. But let's be honest here - now that I'm an adult spending the greater part of my waking hours in a law office, I'm exercising my brain more than the rest of my body. I'll also admit (shamefully), that more often than not, I drive to the office. Yes, me, the environmentally conscious individual who lives a mere 3 blocks (equating to a less-than-10-minute-walk) from her place of work, drives a car. Why? Because I've gotten too damn lazy. I'd rather roll out of bed at 9 and scramble to slip in the office door just as the grandfather clock chimes 10 times than wake up at a decent hour, play with the dogs, take my time getting ready, and enjoy some fresh air (oh right, this is Philly) on my way to work. Honestly, I'd love to do all of those things, but, like I said...I've grown lazy.
We all need a boost from time-to-time, so I'm looking to MFP, and my friends, for some motivation. I've only been using the app for a week, but I love it. Like my cousin, I love scanning the barcodes of my food to enter my daily calories. When I want to search the database, I'll log into my MFP account on the computer to make the process a bit easier. One thing I'd like to put a little time into, and I think will be time well spent, is creating meals. For example, I made falafel last week and went through the process of entering every part of the meal - the canned chickpeas, the pita, tomato, the avocado, the this, the that. If I were to combine all of those ingredients into a meal, I'd enjoy the ease of entering 1 item into my food diary rather than half a dozen.
Along those lines, since it can be somewhat of an annoyance to have to scroll through the database to find all the components of a meal, that alone is a motivator. It's even more of a reason to east simple, fresh meals, even when going out to a restaurant. Last weekend, Ash and I went to a Mexican restaurant for dinner, and I ordered chicken fajitas. The plate comes with it's own tray of toppings, but I kept it simple adding only rice, cheese and avocado to my chicken.
Overall, I think this is something I can stick with long-term, because once I'm in the shape I want, I can reset my account so that it helps me maintain my weight, rather than lose weight. In the past I've kept an online food journal, but I've never counted calories, paid too much attention to serving sizes or otherwise used any sort of precision when keeping track of my eating habits - I just watched for general trends. Now I have a friend to keep my on track - My Fitness Pal!
Tuesday, April 24, 2012
Getting back to "good"
My boyfriend has terrible eating habits. When left to fend for himself, he considers a turkey and cheese sandwich with a side of Ramen as dinner. No, no, no. While there have been some positive influences on his eating styles (he's now able to make tacos for himself), he has always pulled me away to my formerly stellar eating habits, and about 5 pounds of weight gain is the proof. Damn him.
But that's it! No more! It's back to meal plans, staying strong against unhealthy snacking and more dedication toward gym time for this rogue health-head.
Last week, I made two of my old favorites: a frittata and falafel. It's been a fairly long time since I made either, but they were great dinner meals and both were enough to have leftovers for work lunches.
This past Saturday I made a stop at Trader Joe's on my way home from the barn. I've been making a stop there about once a month lately, and stocking up on some staples (like pasta, sauce, frozen goods, etc.). I love the prices at TJ's - I'm able to get better quality goods much cheaper than the grocery store (at least compared to my neighborhood stores). TJ's isn't my favorite for most produce, since I find many of their items to be individually wrapped, but this time I did bring home a basket of plums, a couple bananas, a couple bags of carrots and romaine lettuce. These items were packaged the same way I'd find them anywhere else.
On Sunday, I went through everything I purchased and what I already had at home, and wrote out my week's meals on a dry erase board in the kitchen:
- Tempura shrimp with rice
- Falafel
- Tacos (made with ground turkey)
- Pasta with turkey meatballs
- Caesar salad with grilled shrimp
Friday, March 2, 2012
Burgers, Burgers, Burgers
You know, I do not make burgers often enough at home. I don't have any good reason for it, either.
Last night I made turkey burgers that were simple yet fancy at the same time: ground turkey, Lizano sauce, finely shredded carrot, minced yellow onion and breadcrumbs. The recipe is easy - use whatever quantity of ground turkey needed for the number of burgers you're preparing, and add the rest of the ingredients in whatever amount your tastes desire or require.
In other cooking news, I bought a new frying pan and it's awesome. I've had the same Italian-made frying pans since I moved into my apartment in Philly about 4.5 years ago. They weren't of poor quality, but they also weren't meant to last a lifetime when used as frequently as I have used them. The non-stick coating was coming off, so it was time for them to go.
In their place, I purchased the awesome Bialetti Aeternum saute pan, which has a white ceramic coating. It's absolutely amazing how the food does not stick to the pan at all. I am not even kidding you. I used it for the burgers as well as stir fry. The dark sauce in the burgers of course runs out while they are cooked, and the heat sears it to the pan. While it may look like a nightmare, all it took was a wet sponge to wipe right off. Amazing. It's a concern for me that some of the non-stick coatings on pans can be harmful, but with the ceramic coating, it's much safer. Peace of mind for your health, easy to clean, and the ability to see the bright and beautiful colors of your food as it cooks against the white background...what's not to love?
This is not a sponsored post. I purchased this product myself and this review is solely my opinion.
Friday, February 17, 2012
Friday Night Fix
By the time Friday night rolls around, I'm ready to indulge in "weekend" food for dinner. You know the stuff - pizza, Chinese, chicken fingers, fries. All the stuff that tastes so good but kind of makes you cringe, too. Anyway, tonight I decided to make my own weekend food.


My homemade version included Morningstar Farms Buffalo Wings - vegetarian "chicken" nuggets, Spanish rice and tiny, fresh asparagus sauteed in olive oil with fresh lemon juice squeezed over it.
And rather than indulge in chips or some other unhealthy snack while catching up on some of this week's TV, I air popped some corn, spritzed the popcorn with olive oil and sprinkled it with a little sea salt. Perfect.

And that's Friday night!
Oh hey, it's Friday!
This morning, I treated myself with this:

A grande vanilla latte with skim milk, and a pumpkin spice cookie (okay, two pumpkin spice cookies) from my favorite neighborhood coffee shop.
I pulled over on the side of the road to park my car a little before 10. I felt a twinge of envy for all the people who were getting to enjoy their coffee while relaxing inside, or strolling down the street. It really is a beautiful morning. The sun is shining, you can feel the warmth in the air, and a little green is peeking out here and there. Just more proof that there are always brighter days, especially given the cold, rainy weather we had yesterday.
So last night, I went to my regular ballet class at 6:30 at my gym. I'm starting to feel a little more sense of friendship and belonging with the other people who come to class, even though I don't know their names. I started speaking up, helping others who were having trouble with steps, even after the teacher's demonstration. Then, when class ended, a few of the others in the class encouraged me to come to Zumba with them...so I did! Saying "yes" and going with something new, rather than being nervous about the unknown, has always been a challenge for me. But I joined everyone in the large gym, walked out to a spot on the floor between strangers, and danced my ass off for the next hour. It. Was. So. Fun!
Earlier in the night, when we were doing a choreographed ballet step that took us across the entire floor, my teacher stopped me and said "you have the step right, but I want to see you dance it!" It wasn't the first time an instructor has told me to loosen up. In my 13 years of dancing, I'd definitely heard that one before. So that's what I tried to do during Zumba - loosen up, go with the music, not concentrate so hard on accurately executing every step. Just watch, and dance!
Now...where does all this go? In the end, it's all going to come back to my training work with Charlie, that beautiful beast of a 17-hand Holsteiner. In classical dressage, there is a very important part of riding and training called "let." You can really teach "let," you just have to do "let." It sounds simple - just relax - but it's more than that. It's allowing your hips to open up while your seat and legs melt onto your horse, maintaining a straight yet comfortable back, allowing your shoulders to drop (but don't you dare compromise that posture!) and your elbows to loosely hang at your side. Imagine weights on strings strategically attached to different points of your body, adjusting it into shape. That, is "let."
So, friends, here's to hoping we can all mentally "let" and cruise through Friday onto the weekend!
Oh yeah...and I didn't blow all of last night's hard work with this so-called breakfast...I have a hearty salad for lunch ;)
Monday, February 13, 2012
Homemade chicken soup with pearl pasta
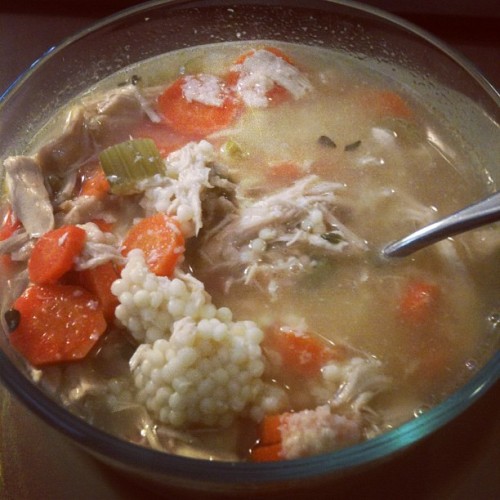
Mmm, my favorite homemade soup! I love this soup not only because it's so delicious and warming on a chilly day, but it's easy to make and doesn't take much time.
A quick trip to the grocery store, and I picked up a pre-cooked rotisserie chicken from the deli along with a few of the ingredients that I didn't already have at home.
I cut the ends off a small yellow onion, then cut it in half and threw it in the food processor and pulsed it a few times. I have to tell you...yellow (and especially white) onions make my eyes water and burn something awful, so I try to have as little contact with them as possible. I poured a few tablespoons of olive oil in a stock pot and put the minced onion in to cook while I started chopping carrots.
Once the carrots were chopped, I put them in the stock pot along with 8 or 10 cups of water and about 2 tablespoons of vegetable Better than Bouillon. I know I've mentioned this stuff before, but it's really great. A concentrated paste than enhances the flavor of your food and tastes way better than any vegetable broth you could buy. And it sure goes a long way. Anyway, back to the soup.
While the water was warming and cooking the carrots, I pulled apart the chicken and added it to the water. The final ingredients to go in were the leafy tops of a few celery stalks, chopped celery and a few sprigs of fresh thyme. I sprinkled in a dash of salt to bring out the flavors, and covered the soup for about a half hour to cook.
To go with the soup, I always make pearl pasta or orzo. Put a few serving spoonfuls of the pasta in the bottom of a bowl, add the soup and sprinkle with grated parmesan cheese. Perfect.
Wednesday, January 25, 2012
The Annual Death Cold
This past weekend I began coming down with the annual winter death cold - the one that leaves you sniffling and stuffed up at the same time, sucks every last bit of energy you have, makes your body feel like you've been beat up by a gang of people.
My go-to supplies for something like this are simple. I start with Traditional Medicinals Gypsy Cold Care tea. I buy this at my co-op, but I believe Target carries it and I'm sure Whole Foods would have it, if not something similar. It's a caffeine-free herbal tea made from a fusion of the best cold-fighting herbs. When I boil water in my tea pot, I add minced ginger before boiling. I love making stir-fry, so this is something I always have in a jar or tube in my fridge. Its immune-boosting properties are helpful during a cold - read more about it here. Finally, once the water has boiled and I pour it over the tea bag to steep, I add a squirt of local honey (honey has natural antibacterial properties - especially raw honey - and local honey can help you fight some of those allergy triggers).
This lovely cold also seems to take away any bit of appetite, so I love to have tangerine popsicles in the freezer. I buy the no-sugar-added, all-fruit kind. These give a little boost of vitamin C and put a tiny bit of something in my stomach.
And of course, rest, rest, rest!
Friday, January 20, 2012
Hold up...
Did I seriously go from the end of October to the middle of January without posting a single thing about food? For shame...
Thursday, January 19, 2012
Quick, easy, healthy work lunch:
Packing lunches for work can sometimes be a total drag. Every now and then you luck out with leftovers from last night's dinner, but other times you're on your own and starting from scratch. I always seem to find myself without decent options, but last week I did think about lunch (instead of just dinner) before I went grocery shopping, and ended up with some decent options.
At home while I was getting ready for work, I boiled water and made a serving of pasta:

Then at work, I microwaved steam-in-bag veggies I found on sale at the grocery store:

I mixed the two together, put back in the microwave for a minute with shaved parmesan cheese, and enjoyed a delicious lunch!

This would also make an easy dinner-for-two with a baked chicken breast added to the mix.
I purchased a few of these Green Giant veggie mixes, and was sure to read the nutrition facts before making my selections (since some of them contained seasonings or in this case, a butter sauce). My body reacts pretty harshly to excess sodium (think pudgy hands), but I was happy to see that this particular mix only contained 9% daily value of sodium per serving (entire package was two servings). I think I may need to go back to the store and stock up! Shhh...
Fun Fact: I took these pictures using the Instagram app on my iPhone.
Thursday, January 12, 2012
Iron Hill Brewery
Hey all! Last night Ashley and I had a date night at the new Chestnut Hill Iron Hill Brewery. There are several other locations in the state, but neither of us have been to one yet. We were particularly excited about this new location because there is a very small selection of places we like to eat in my neighborhood.
There's one local pub that is packed to the doors if there is ever any sort of sports game on TV (and with Philly having a team for all the major sports, that's almost every night). The service there also leaves a lot to be desired. There's also a brewery and flatbread restaurant with a very unique atmosphere, but you can't really show up wanting a big meal, as the food is a little on the lighter side. But anyway, back to Iron Hill.
The first day of business for Chestnut Hill was on Wednesday, January 4. We were thinking about going this past weekend, but figured there would be a long wait on its first weekend open for business. So instead, we made a reservation (they offer online reservations through Open Table) for last night. That was an excellent decision, because when we arrived, the entire waiting area was full and the wait time was almost an hour!
Over the weekend, we took a look at the extensive menu online. Oh my gosh - amazing. I have to say, it was really difficult to choose what to order, especially since there were three meals I really wanted to try: the chicken pot pie, the shrimp scampi linguini and the turkey burger (seriously...you can rarely find a place that serves a good turkey burger). I finally decided on the chicken pot pie, and Ashley chose the Hawaiian spiced Ahi tuna. We also had a small order of buffalo chicken wings for an appetizer (amazing buffalo sauce!) and an apple fritter with a scoop of vanilla ice cream for dessert. Everything was made extremely well with great flavors and decent serving sizes.
And what about the beer? Well, we were seated right next to a window looking into the brewery (cool!). I ordered a raspberry wheat and loved the flavor. I tasted a light raspberry flavor first, finishing with that classic wheat beer flavor. Definitely not an overbearing or syrupy fruit flavor like some others I've tried, and it was a nice light color. Ashley ordered one of the featured Belgian seasonal brews, the Belgian Pale Ale. It has a great flavor - not too strong and not too weak, not excessively hoppy and a light brown color.
The service was great from the hostess to our server. The restaurant is really nicely designed with several semi-divided eating areas that provide plenty of options for the kind of atmosphere you want - quieter toward the back of the restaurant, or in the middle of the buzz up front by the bar. We were close to the kitchen, and saw the unending rush of servers back and forth all night. I think it was just as busy when we left as when we first walked in the door (our reservation was for 7:30 p.m. and we left around 9).
Overall, it was a great experience and I can't wait to go back again in a few weeks with friends!
Sorry for the lack of pictures in this post, but I was sure to provide lots of links to several different sections of Iron Hill's website. Enjoy!
Subscribe to:
Posts (Atom)