I can't wait until the day when I have my own front porch to decorate with corn stalks and jack-o-lanterns, but for now a few decorations here there will have to work for apartment living. A holiday wreath is perfect for that.
I found a tutorial for making felt flowers, and wanted to use that idea for a fall wreath. With a $5 grapevine wreath, a spool of ribbon, a few small sheets of felt, silk autumn leaves, straight pins, glue sticks and a hot glue gun, you'll have everything you need for your wreath.
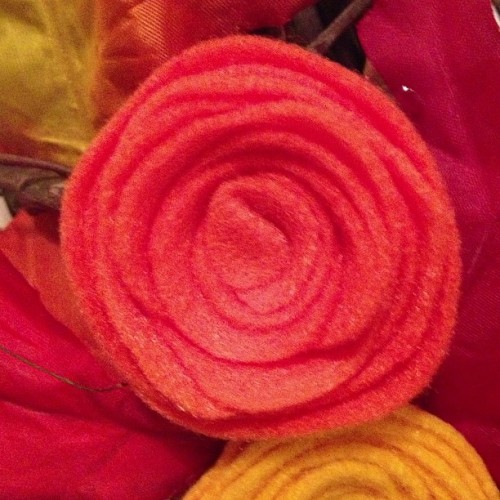
To make the flowers: Place a circular object like a CD on the sheet of felt. The small sheets in the craft section are big enough for three CD-sized circles. Trace the circular object with permanent marker. First, cut the full circle out of the felt. Then, begin cutting the full circle into a spiral toward the center. If you cut a wavy-line spiral instead of a cutting a smooth edge, when you roll the felt up, your flower edge will look like real petals. Once you've cut the spiral, pinch the inside end of the spiral-cut felt, and begin wrapping the strand counter-clockwise around the outside of the pinched end. Poke a straight pin through the flower from the outside edge to the middle, and you're finished! Super easy. You can also use hot glue to glue down the outside end of the felt strand after wrapping it.
Make as many flowers as you want in as many colors. I chose a deep red, orange and yellow. The craft store had lots of pretty shades (you know, to avoid looking like you're making a decoration for the front door of your neighborhood McDonald's). Once your flowers are all made and secured, set them aside.
 I bought a strand of leaves from the craft store, and cut off individual leaves that I wanted to use for the wreath. I played around with the different sizes, shades and overlap of the leaves. Once I figured out an arrangement I liked, I just wove them, stem first, into the vines of the wreath without any further securing. My wreath will be hanging indoors, but for an outdoor wreath you may want to use hot glue to secure the leaves to the wreath.
After your leaves are placed and secured, it's time to add the felt flowers. If you finished your flowers with a straight pin, be sure to arrange them so that the head of the pin is not showing. The backside of the flowers should be mostly flat, making it pretty easy to add hot glue and attach them to the wreath. A spiral of glue on the back of the flower and pressing and holding it in place for a few seconds should make it secure. Allow the wreath to remain on a flat surface for a few minutes while the glue dries to be sure everything stays tightly in place.
With your spool of ribbon, you can make a loop to hang your wreath - measure twice, cut once! Use a solid colored wide ribbon, or get creative by mixing different colored or patterned thinner ribbons and twine.

No comments:
Post a Comment